

Hey folks, welcome back! Today, I’m going to walk you through the install of the SPELAB aluminum valve cover along with their oil catch can option on my 2003-2024 Dodge Ram 2500/3500 6.7L/5.9L Cummins. I’ve been running these trucks for a while now, and let me tell you, this is one upgrade that really makes a difference in keeping things running cleaner and looking sharp under the hood.
So, without further ado, let’s get our hands dirty.
Getting Ready – Tools You’ll Need
Before jumping in, here’s a list of tools and supplies to have on hand. Trust me, having these ready will save you a lot of time and frustration in the middle of the job:
-
What you’ll need:
- 8mm and 10mm sockets (You’re going to use these a lot!)
- Allen wrenches (for those small, tight spots)
- A torque wrench, set to 10-14 ft-lb (Don’t eyeball it, use the wrench!)
- Hose cutters (especially if your hoses are too long)
- Pliers for pulling and gripping
- Hose clamps (because you don’t want anything slipping off later)
-
Parts:
- The SPELAB is fit for 6.7 cummins valve cover (comes with O-rings and bolts)
- SPELAB oil catch can kit (optional but highly recommended if you want cleaner air intake)
- A set of gaskets (just in case the old ones are toast)
If you’re like me, you know that factory plastic valve cover just doesn’t cut it anymore—especially if you’re looking for durability and better heat resistance.
The aluminum one from SPELAB is not only tougher but looks a whole lot better when you pop the hood. Plus, it pairs perfectly with their oil catch can, which helps keep all those oil vapors out of your intake.
I’ll walk you through both installs, but let’s start with the basics.
Step 1: Pulling Off the Stock Valve Cover
First things first, we need to get the factory valve cover off. This is a straightforward process, but it pays to take your time and not rush. Here’s what you need to do:
-
Disconnect the intake and hoses: You’ll need to take off the cold air intake tubing to make some room. Once that’s out of the way, go ahead and pull off the vent hoses connected to the valve cover. I always keep a set of pliers nearby for this—those hoses can be stubborn.
-
Remove the valve cover bolts: Using your 10mm socket, remove the six bolts holding the OEM cover in place. Make sure you don’t lose track of any sensors or connectors attached to the cover. Trust me, there’s nothing worse than finishing the job and realizing something’s still hanging loose.
-
Inspect the gasket: This is the point where you want to check the gasket. If it’s cracked or worn, replace it. You really don’t want to deal with an oil leak after going through all this work.
Step 2: Installing the SPELAB Aluminum Valve Cover
Now for the fun part—installing the new valve cover. This aluminum cover is leagues ahead of the OEM plastic one. Not only does it handle heat better, but it’s also way more durable. Here’s how to get it done:
-
Fit the O-rings: First thing, make sure the O-rings that come with the valve cover are fitted properly. This might seem like a small step, but skipping it can cause big headaches later. If the O-rings are off, you could end up with oil leaks.
-
Adjust hose fittings: SPELAB did a great job here by making the hose fittings adjustable. Depending on how you like to route your hoses, you can flip these fittings around for a cleaner look. Personally, I like to keep everything tucked in and neat, so I took a little extra time adjusting them.
-
Tighten down the bolts: Now, grab your torque wrench and start tightening the bolts. You’re going to want to go from the middle outward to ensure even pressure. Tighten them to 10-14 ft-lb. Don’t go crazy here—tight but not over-tight.
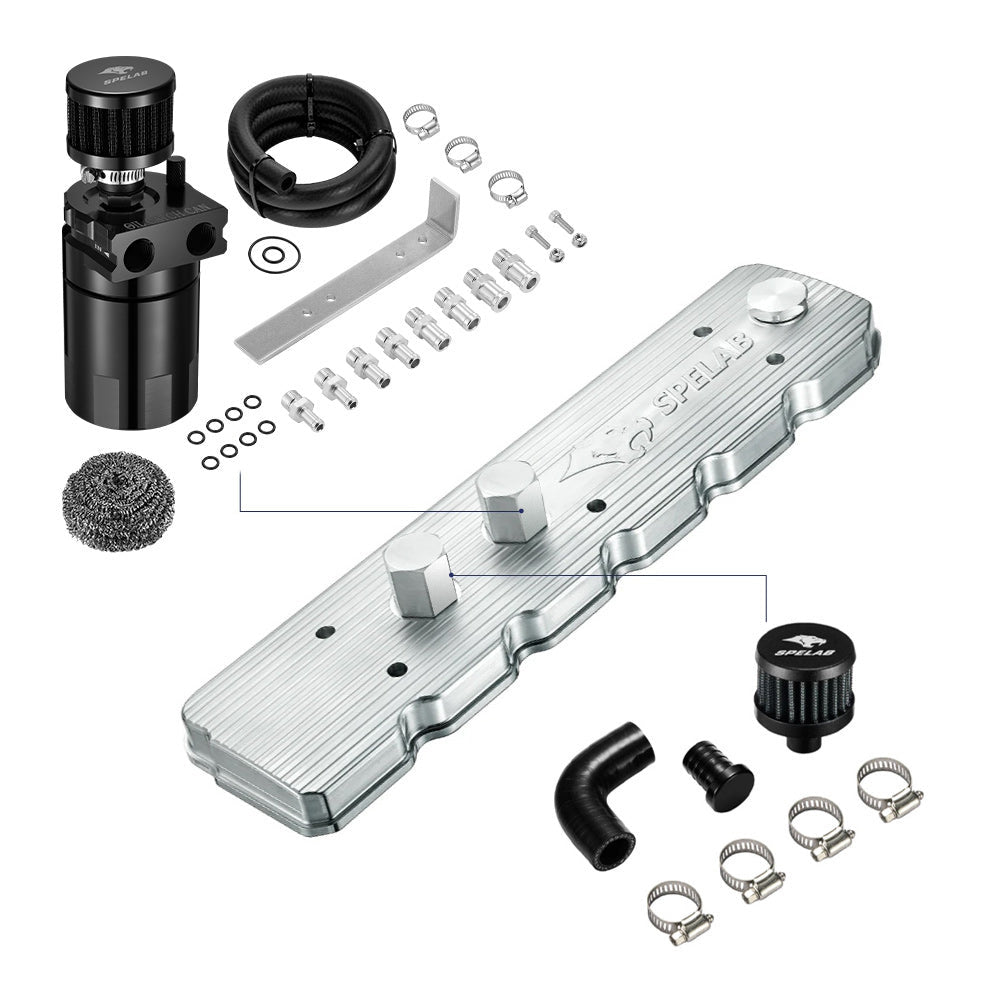
Valve Cover Aluminum for 2003-2024 Dodge 6.7L/5.9L Cummins Diesel Dodge Ram 2500/3500 | SPELAB
for 6.7 cummins
$637.98
Buy Now
Step 3: Setting Up the Oil Catch Can (Optional)
If you’re installing the oil catch can (which I strongly suggest if you want to keep your intake system clean), now’s the time. The catch can is a game-changer for reducing the amount of oil vapor that re-enters your intake system.
-
Mount the catch can: First, find a good spot in your engine bay to mount the can. The SPELAB kit comes with a handy L-bracket to make this easier. I like to mount mine in a spot where I can easily reach it to empty it later.
-
Run the hoses: Once the catch can is mounted, connect the hoses from the valve cover’s vent ports to the can. Again, take your time to make sure the hoses are routed neatly and aren’t rubbing against anything that could wear them out.
-
Trim hoses as needed: If your hoses are too long, go ahead and trim them. It’s important that they’re the right length so they don’t kink or cause other issues. Once you’ve got everything set, secure the hoses with clamps.
Final Touches and Checks
Before you call it a day, there are a few more things to check.
-
Double-check connections: Take a few minutes to go over everything. Make sure all the bolts are tight, the hoses are clamped, and there aren’t any loose connections. You’ll be glad you did this once everything’s running.
-
Fire up the engine: Start the engine and let it idle for a few minutes. Keep an eye out for any leaks around the valve cover or catch can, and listen for any odd noises. If all looks and sounds good, you’re good to go.
-
Ongoing maintenance: One last thing—don’t forget to check the oil catch can regularly. SPELAB makes it easy with a built-in dipstick, so you can see when it’s time to empty it without taking everything apart.

What Makes the SPELAB Valve Cover Worth It?
After running this setup on my truck for a while, I’ve got to say, SPELAB knocked it out of the park with this one. The aluminum valve cover is not just about looks—it’s about performance too. It holds up better to heat, provides better sealing, and just feels more solid compared to the factory cover. And with the oil catch can, you’ll be reducing that pesky oil vapor buildup, keeping your intake system cleaner, and improving overall engine efficiency.
If you’re serious about performance or just want your engine bay to look a little more polished, this is a great upgrade. You’re not only getting better durability but also peace of mind knowing your engine is running cleaner.
Conclusion
And that’s it! You’ve successfully swapped out the OEM valve cover for SPELAB’s aluminum one and, if you went for it, added an oil catch can to keep things running smooth.
I hope this guide helped you out, and if you’ve got any questions or need more advice, feel free to drop a comment. I’ve got more SPELAB installs coming up, so stay tuned. Until then, keep wrenching and enjoy that clean engine bay!
FAQs
Q1: What tools do I need to install the SPELAB aluminum valve cover and oil catch can?
A1: You will need an 8mm and 10mm socket, an Allen wrench, a torque wrench (set to 10-14 ft-lb), hose clamps, pliers, and a tube cutter.
Q2: How difficult is the installation process for a DIY enthusiast?
A2: The installation is moderately difficult, requiring basic mechanical knowledge and the right tools. The step-by-step guide provided can help you complete it in your own shop.
Q3: Can I install the valve cover without the oil catch can?
A3: Yes, the valve cover can be installed on its own. The oil catch can is an optional upgrade that helps improve the engine’s performance by reducing oil blow-by.
Q4: What are the main benefits of installing the SPELAB aluminum valve cover?
A4: The aluminum valve cover is more durable than the OEM plastic version, improves heat dissipation, and enhances the overall appearance of your engine bay.
Q5: How does the oil catch can improve engine performance?
A5: The oil catch can filters out oil vapors from the crankcase ventilation system, preventing them from entering the intake and causing carbon buildup, which can improve engine longevity and performance.
Q6: Do I need to adjust the hose fittings for the valve cover installation?
A6: Yes, depending on your vehicle's setup, you may need to adjust the direction of the hose fittings for optimal hose routing and to avoid interference with other components.
Q7: What should I check before installing the new valve cover?
A7: Make sure the gasket is free from cracks or damage and clean the area around the valve cover to ensure a proper seal.
Q8: How often should I check the oil catch can for maintenance?
A8: The oil catch can should be checked regularly. Use the built-in dipstick to monitor oil levels and empty it as needed to maintain its effectiveness.
Q9: Will the installation of the SPELAB valve cover and oil catch can void my vehicle’s warranty?
A9: It depends on your vehicle's warranty terms. Some modifications may affect the warranty, so it’s best to consult with your dealer beforehand.
Q10: Can I reuse the OEM bolts and O-rings when installing the new valve cover?
A10: It’s recommended to use the new bolts and O-rings provided by SPELAB to ensure a proper fit and avoid leaks.


2 comments
cory levi, I just installed mine as well following the steps in the video listed above. I to am running into the same issue if you figure the fix please reach out, 9 seven 2, 4 eight 9, sixty 80
Got mine installed this past weekend and so far it looks great but it’s dumping too much oil into my turbo making my truck smoke rather badly. Going to try and fix it this weekend but so far not too happy with. I will update when I can